

It’s simple to grow your own mushrooms. From shiitake and oyster mushrooms to button mushrooms, there are a variety of mushrooms you can grow at home. Some mushrooms can be cultivated in a substrate mix, while others come as dowels that must be drilled into logs.
Mushrooms have been grown in China for thousands of years and are a genuinely high-value crop. Their earthy flavour brings out the umami in everything from brothy soups to white pizza.
You’ll discover everything you need to know about growing mushrooms on logs in this guide. The species of mushrooms you can cultivate, the logs you should use, and step-by-step instructions for the entire procedure are all included.
Why should you grow mushrooms on logs?
Whether you simply have a few trees in your garden or own a farm or a small woodland, there are many reasons to grow mushrooms on logs.
- It’s a low-cost method of growing fresh, healthful, and nutrient-dense mushrooms.
- Allows you to add value to timber species that might otherwise be considered unwanted.
- In the undergrowth of your forest, you can grow a variety of medicinal and edible mushrooms.
- Mushrooms can broaden the range of things you can sell, as well as your revenue streams. They also enable you to develop new markets for your products.
- Growing mushrooms in the woods can help you offer more employment and expand work periods if you own a farm.
Which types of mushrooms can be grown on logs?
On trees, you can grow both edible and medicinal mushrooms. Here are a few possibilities:
Oyster Mushrooms (Pleurotus ostreatus)
Oyster mushrooms are available in a variety of colours and flavours. While they’re produced commercially on substrates like straw or coffee grounds, they naturally grow on trees, making logs an excellent alternative. They do well on hardwoods, particularly beech.
Because oyster mushrooms have a short incubation time, it is possible to harvest them from your logs in the autumn of the same year you inoculated them. The logs can produce mushrooms from spring to autumn once established.
They have a high nutritional value, and if you plan to sell them, they are popular and command a high price.
Buy Now Blue Grey Oyster Mushroom Plug Spawn From £6.99Shiitake Mushrooms (Lentinus edodes)
Shiitake mushrooms have a firm texture and a strong flavour, making them ideal for Asian cuisine. They also have medicinal benefits, such as cholesterol reduction and immune system stimulation.
It has a more extended incubation period than oyster mushrooms, taking anywhere from 9 months to 2 years to fruit.
When dehydrated, shiitake mushrooms retain their flavour and are simple to rehydrate. As a result, drying them is an excellent technique to keep large quantities before they spoil.
Buy Now Shiitake Mushroom Plug Spawn From £7.50Lion’s Mane (Hericium erinaceum)
The lion’s mane mushroom is an unusual looking mushroom with white teeth that give it a shaggy appearance, earning it the name.
When fully ripe, these mushrooms reach a diameter <40 cm. Use logs with a diameter of at least 10 inches to achieve the biggest fruiting bodies. The mushrooms will grow in size in proportion to the size of the logs.
It might take anywhere from one to three years for lion’s mane to begin growing, depending on the type of wood used and the size of the log. Beech, elm, poplar, and maple are just a few of the woods that lion’s mane thrives on.
Buy Now Lion's Mane Mushroom Plug Spawn From £15.99Reishi (Ganoderma lucidum)
Reishi is a medicinal mushroom, not a traditional edible one. To make tea, it’s best to dry it and grind it into powder.
It favours oak and plum logs to grow on. After inoculation, this mushroom will not produce fruit until the second season.
Because reishi requires a high humidity level, it’s better to place logs directly on the soil surface. Stacking logs will most likely dry them out and make them unusable. Reishi logs are sometimes buried halfway in the earth.
Buy Now Reishi Mushroom Plug Spawn From £7.98Maitake (Grifola frondosa)
A fully developed cluster of maitake, pronounced “my-tak-ee,” can weigh up to 50 pounds and resembles a hen resting on a nest, hence its nickname “Hen of the woods”.
Maitake is a mushroom that grows nearly exclusively on the base of oak trees. They like really damp conditions, so ensure to water them often.
They are best served cooked and have a distinctly earthy, peppery flavour. When cooking them, make sure to use savoury and salty ingredients to balance them out.
Buy Now Maitake Mushroom Plug Spawn From £7.98Chicken of the Woods (Laetiporus sulphureus)
One of the most conspicuous mushrooms is Chicken of the Woods. This lovely, well-known forager’s treasure can be grown on the hardwood tree species of Oaks and Green Ash. In nature, Chicken of the Woods mushrooms are slightly parasitic on their host tree, necessitating a different planting method than most other log-grown species.
To grow these beauties, the wood must first be treated by pressure cooking, steaming, or boiling. This extra process is worthwhile because logs can bear fruit for many years.
What types of tree logs can be used for growing mushrooms?
Both shiitake and oyster mushrooms can be grown on most hardwood species. As a result, you can select your logs based on the type of hardwood available on your property or in your region.
Shiitake mushrooms are fond of oak, sugar maple, and red maple trees in particular. White birch is often the ideal place to grow oyster mushrooms.
Though mushrooms can also be grown on alder, birch, oak, maple, beech, poplar, balsam, aspen, elm, and willow.
How long does it take to grow mushrooms on logs?
Growing mushrooms on logs is a longer-term process than growing them on, for example, coffee grounds. After the logs have been inoculated, most mushrooms will take 1 to 2 years to produce their first crop. But once the mushrooms begin to grow, you should be able to harvest them for 6 or 7 years from the same log.
How to Grow Mushrooms on Logs: The Steps to Success
Choose the types of mushrooms you want to grow and order your growing kit online. The growing kit usually includes small wooden dowels impregnated with mushroom spawn.
What you’ll need
- Mushroom growing kit, comprising dowels, wax and wax applicator
- Fresh logs – preferably hardwood
- Hammer
- Drill with 8mm bit (depending on the size of dowels)
- Gas cooker (if not near to a domestic stove)
- Pan for heating the wax
Step 1. Finding and selecting the correct log
The optimal time to harvest logs is in the colder months. This is because trees are in a state of dormancy at this time; therefore, their sugar concentration is higher, and their bark is more bonded to the tree.
The size of the logs used to produce mushrooms varies. However, the longer it takes for the mycelium to colonise the entire log length and begin growing mushrooms, the longer it will take to produce them. However, once a larger wood has been colonised, it will continue to produce mushrooms for a longer period of time. You can inoculate fresh tree stumps as you would logs.
When choosing logs, it’s critical to select healthy trees. Due to pre-existing fungi that may reside in the logs, any tree with rotted wood or evidence of infection faces an increased risk of competition with pre-existing fungi in the logs.
Step 2. Cutting the growing log to size
When choosing a size, it’s critical to consider how you will move the logs. Oversized logs can be challenging to transport and can injure people. For mushroom cultivation, logs with a diameter of 8 to 25 cm and a length of up to 1.25 m are ideal.
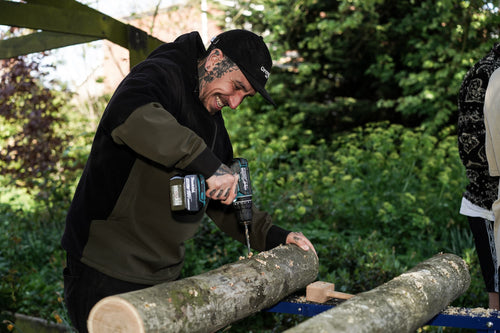
Step 3. Drill holes for your plug spawn
For a 1m long log, 30 to 50 plugs are typically required for complete coverage. You can use the following formula to determine how many plugs you’ll need for each particular log:
- (Length of the log in cm x diameter of the log in cm) / 60 = Number of holes
Begin by drilling a row of holes every 15 cm along the length of your log. This is deep enough that after you hammer your plug into the wood, a slight gap will be left underneath it, providing an excellent environment for the mycelium to grow.
Place a piece of tape on your drill bit at the same depth as is required for your dowel to keep track of how deep you need to drill without measuring each time.
After you’ve finished the first row of holes, stagger the placement of the next holes. Begin the next row of holes about 6 cm apart from the first row, staggering the rows to produce a diamond or checkerboard design.
Step 4. Insert your inoculated dowels into the log
Now it should be simple to get your plug spawn dowels into the hole. All you have to do now is tap them gently with a hammer to get them firmly inserted.
Your plugs should be flush with the log’s wood and slightly below the surface of the bark. That way, you’ll be able to use wax to close the hole.
Step 5. Seal your spawn dowels with wax
This is a critical step to ensure your mycelium will stay safe and uninfected. Soy wax is the most popular type of wax used to fill holes; however other types of wax, such as cheese or beeswax, can also be used.
You’ll also need a technique to melt your wax by heating it. You can use a crockpot, an old deep fryer, or just an old pot on a propane stove.
You’ll want to use a wax applicator to apply the wax to your holes once it’s melted. You can buy them cheaply, or you can create your own with a cotton ball or cloth, or use a little brush.
Step 6. Preparing your growing logs for incubation
Once you have inserted the spawn into your logs and sealed them with tax, your logs are pretty much ready to be left for incubation. Though as mentioned earlier, if you’re growing Chicken Of The Wood mushrooms the process will be a little bit different.
For Chicken Of The Woods, before you inoculate your logs you should treat your logs by placing them into an autoclavable bag, there are three methods you can use to treat your logs.
- Pressure Cooking or Sterilizing – The most successful treatment is this. In the pressure cooker, place the bundled log. Except where the log rests on the canner rack, don’t let any plastic touch the canner surfaces. Add enough water to reach a 120-minute cook time, which normally requires several inches. A portion of the log will be submerged. Important: Because pressure cookers differ in design and function, always read your pressure cooker manual for operating instructions. Sterilize for 120 minutes at 15 psi. Cooking can also be done in 60-minute increments in separate pots.
- Steaming – In the steamer, I placed the bundled log. For at least 3 hours, steam the log. When steamed for 6 hours, the contamination rate is the lowest. During steaming, keep an eye on the water level.
- Boiling – In a big saucepan, place the bundled log and bring to a low rolling boil for 1 hour. Water should not be allowed to enter the bag. It’s important that the log doesn’t get too moist.
The logs are ready to inoculate once they have cooled. When the logs are treated, they can be packaged and stored in a clean environment until inoculation.
Step 7. Where to place your log for incubation
During incubation, there are several options for storing logs. You’ll want to keep your logs somewhere shaded, such as against the side of your house or beneath a tree.
Another common method for storing logs is to alternate them, laying two in one direction and two perpendiculars, alternating back and forth to create a log tower, this is called cribb stacking.
The most important thing is to store your logs in an area with sufficient air circulation and a high degree of humidity.
To protect your logs from strong sunlight in exposed locations, simply cover them with a thick cloth.
If you’re growing at a time when temperatures are consistently below freezing, it’s important to give your mushroom log kit a little extra protection for the winter. You can over-winter your logs in a log in an unheated garage, barn, or shed to keep it safe from freezing winds. This will also speed up incubation and therefore mean faster harvests.
Step 8. Maintenance throughout incubation
To keep the optimal moisture level in your logs, water them with a hose once or twice a week for 10 minutes in dry conditions. Your mycelium will die if they dry up.
It’s a good idea to keep your logs close to your garden hose. Otherwise, you’ll be hauling buckets back and forth all the time!
Step 9. Shocking/initiating your logs into fruiting
By starting or shocking your logs, you can hasten the creation of your mushrooms. Allowing them to soak in cold water for 24 hours accomplishes this. You can do this in a stream or pond, a child-size swimming pool, or even bathtubs or canoes!
You should wait at least 6 to 9 months before shocking your logs to guarantee that the mycelium has colonised most of the log. Instead of waiting 2 or 3 years for mushrooms to grow naturally, shock is an excellent way to speed them up naturally.
You can also shock your logs by hammering the ends to replicate a tree falling, a trigger that encourages organisms to fruit. You can do this by knocking the ends of the log with a hammer. The best time to do this is in the spring and autumn, as the summer months may be too hot, and the mycelium will be dormant in the winter months.
If you believe your logs have finished producing mushrooms, it is good to try shocking them again as this will often induce an extra flush.
Check for evidence of colonisation near the end of the incubation. You can see the whitish mycelium growing if the logs’ ends aren’t sealed (an exception to this is chicken of the woods, which has a dark mycelium). White mycelium may also be visible in the log’s cracks and plug holes. This will usually begin in a star shape and join up over time to cover the majority of the end on the cut ends. If there are no traces of mycelium after 12-18 months, your mushroom species has most likely been outcompeted and unfortunately died.
Step 10. Harvesting your mushrooms
Most mushrooms that grow on logs only produce fruit once or twice a year. Spring and autumn are the most common times. Increased rainfall and large temperature fluctuations signal to mushrooms that it’s time to fruit.
It’s critical to check on your logs on a frequent basis to evaluate how they’re progressing. Mushrooms can multiply quickly once they begin to grow. In just a few days, fully developed mushrooms can sprout from nowhere.
Harvest your mushrooms as soon as possible; this is because most mushrooms are too rough and woody to eat after around three weeks of growth. Plus, the longer you leave them on the log, the more likely insects and other pests will discover and eat them.
If this blog has inspired you to learn more about mushroom growing, why not grow your own shiitake mushrooms? Growing shiitake mushrooms is a fulfilling experience that truly pays dividends over time, though it can be challenging to get started with. If you’d like to learn more, read our full blog on growing them here.