

If you’re looking to grow mushrooms outdoors – look no further. In this guide, we’ll walk you through the steps of setting up your own mushroom bed, so you can start growing your own delicious mushrooms with little effort!
Growing your own mushrooms is something that is usually done in an indoor environment, but if you’re looking to use an outdoor space or simply want to try something new – an outdoor mushroom bed may be the best option for you.
More interested in growing mushrooms on logs? Check out our detailed guide to growing mushrooms using logs.
Why grow mushrooms outdoors?
There are a few key reasons why you might want to grow your mushrooms outdoors:
- Mushroom beds make great use of shaded areas of your garden which may be unsuitable for other crops or plants.
- It can be cheaper and easier than growing them indoors. There’s no need for special equipment like ventilation or lighting, and you can use materials that are commonly used for other crops.
- You can harvest larger quantities of mushrooms at once. With an outdoor mushroom bed, you can expect to get several harvests throughout the year, as opposed to just one or two if you were to grow them indoors. You may find you also have more space
Are there any downsides to growing mushrooms outside?
Contamination
The biggest downside to growing mushrooms outdoors is the increased exposure to potential contaminants. If you happen to live in an area with plenty of trees, then you may be at risk of contamination from wild spores in the environment.
The good news is that there are ways in which we can reduce the risk of contamination by ensuring we pasteurise or sterilise our substrate mixture before inoculation.
If you’re trying to grow mushrooms but don’t think you have the space required, check out our guide to growing oyster mushrooms or our guide to growing shiitake mushrooms which include indoor growing techniques.
What is a mushroom bed?
A mushroom bed is an outdoor growing area that has been prepared with a substrate mixture like straw or other organic material and spawned (inoculated with mushroom mycelium). The mixture is then left to colonise and grow mushrooms.
The mushroom bed’s structure can be made from a number of materials – such as wood, bricks or concrete blocks – you may even be able to find readymade mushroom beds online.
The key to success with the bed is creating an environment conducive enough for your mushrooms; they should avoid excessive sunlight and have optimal water drainage so the substrate doesn’t become waterlogged.
How does a mushroom bed work?
When you grow mushrooms in a mushroom bed, you’re essentially allowing the mushrooms to grow much like they would in the wild.
Whilst optimal conditions depend on the species you’re growing – and you will want to ensure your outdoor space caters to this (some species of mushrooms have very specific growing conditions) – growing in a mushroom bed opens your mushrooms to a varied and regularly changing environment.
When compared with other forms of mushroom cultivation, mushroom beds are considered a low maintenance growing technique.
Once inoculated with spawn, the mycelium will start to grow and colonise the substrate, which – in the case of a mushroom bed – is essentially a form of compost.
The main difference between a mushroom bed and other popular growing environments – such as a mushroom growing bag – is the level of control you have during the different phases of mushroom growth.
What substrates can be used?
There are many different substrates that can be used to grow mushrooms outdoors, but some work better than others. Some popular substrates for growing outdoors include:
- Hardwood woodchips: This is a great option if you want to grow King Stropharia mushrooms. King Stropharia mushrooms love to grow on hardwood woodchips.
- Straw: This is a good option for growing oyster mushrooms. Oyster mushrooms prefer to grow on straw that has been chopped into small pieces.
How to find the right spot for your mushroom bed
One of the most important things to consider when growing mushrooms outdoors is where you will position your mushroom bed. Whilst you may be limited by your space, the spot you choose should ideally get plenty of sunlight to have some form of shelter so that it won’t be affected by wind or rain. It’s also important to make sure the soil is fertile and has good drainage to prevent waterlogging.
How to build a mushroom bed
Determining the approach - should I build a raised bed?
A mushroom bed can be as basic or as sophisticated as you like – it’s your call. With that said, there are some benefits to building a raised bed but it will require additional effort, resources and some DIY skills.
The most basic mushroom bed can literally be an area filled with wood chips and spawn. Building a raised bed allows you to have greater control over potential contaminants or weeds in your bed. It also allows you to self contain your mushrooms for easier maintenance.
What do I need?
- Substrate mixture
- Straw or mulch
Step 1. Find a spot to place your mushroom bed
The first thing you will need to figure out is where to place your mushroom bed in your outdoor space. If you’re looking to grow a specific species of mushrooms, then the optimal placement may vary depending on the preferred growing conditions of your chosen species.
Generally speaking, however, the best place is in a shaded or partially shaded area that has good water drainage. Whilst some species of mushrooms can tolerate some direct sunlight, it is best to avoid areas with too much sun. It is also best to avoid open areas with high rainfall.
The ideal placement for a mushroom bed is often under trees, bushes or other foliage.
Step 2. Building the base of the mushroom bed
There are a few ways you can go about building the base to your mushroom bed. Some people opt for raised beds, but many also choose to either dig a bed into their soil patch or simply lay the materials on a patch of ground.
The basic idea for a mushroom bed is to have a dedicated area to place your substrate mix and for your mushrooms to grow.
The easiest approach is to find a space to fit your needs and to add your substrate mix and wood chips. Some people prefer to dig out their bed first to lower the bed into the ground – this isn’t necessary for successful growth, however.
For a quick setup, we would recommend using pieces of wood, bricks or blocks and outlining the area for your mushroom bed.
How to Build a Raised bed
If you’ve decided to try your hand at some crafty DIY, you can build a simple raised bed – similar to that for other commonly grown crops.
You’ll need:
- Pressure-treated timber or hardwood constructional timber
- A spirit level (optional)
- Measuring tape
- Electric drill and timber screws
Step 1. Dig strips of soil out to create small ‘trenches’ to fit your timber of choice
Step 2. Lay your timber out in place and ensure they are level with your spirit level. To do this, simply lay the spirit level diagonally across two pieces of timber at a time.
Step 3. Ensure your raised bed corners form right angles. If you’re creating traditional rectangular or square beds, ensure you have two sets of timber with equal lengths. We recommend getting these pre-cut to size if you have the option available to you.
Step 4. Using a rubber mallet or a hammer and an off-cut of timber (to prevent damage to your frame), carefully tap the timber lengths to become flush with the joining length – maintaining level whilst doing so.
Step 5. Using a power drill equipped with a drill bit, drill through the end pieces of timber into the adjacent frame piece. Next, use heavy-duty screws to fix the pieces together.
Step 6. Depending on the height you’re looking for with your raised bed, continue this process by layer an additional length of timber frame on top of the base. Be sure to overlap the previous layer, so that your frames are staggered over connecting joints.
Step 7. Line the base of your mushroom bed with an organic material to retain moisture beneath the bed and to prevent weed growth. You can use either garden felt or pieces of cardboard.
Step 3. Layering your mushroom bed with hardwood woodchips and spawn
Now that your mushroom bed base has been assembled, you should start to layer the space with untreated wood chips or mulch. A top tip for new growers: whenever you use an organic material like straw or wood chips, be sure you’re using a variety that hasn’t been treated with antifungal chemicals. This is often the case when purchasing materials intended for construction or animal bedding.
Once you have covered the base with wood chips, it is time to start alternating between layers of wood chips and layers of mushroom spawn.
Step 4. Cover The Mushroom Bed with Straw or Mulch
Once you have layered up your mushroom bed with your substrate and spawn mix, it is recommended that you layer the surface of the bed with straw or mulch. This top mulch layer acts as a shield to the external environment – helping to retain moisture within the bed, prevent weed growth and offer some insulation to your growing environment.
How to Maintain Your Mushroom Bed
Retaining moisture within the mushroom bed
Maintaining a mushroom bed requires very little effort when compared with other popular cultivation methods. The key is to ensure that your mushroom bed has sufficient moisture. As a general guide, aim to soak your bed with water once a week when no rainfall has occurred.
Feeding your mushroom bed
Aside from maintaining moisture levels in your bed, it is important to provide your mycelium with fresh material. We recommend mixing in a new layer of hardwood wood chips or sawdust once a year to feed your mushroom mycelium. This does not need to be a thorough layering process like the setup stage, adding a fresh top layer will suffice.
Harvesting your mushrooms
Be sure you are harvesting mushrooms you have grown
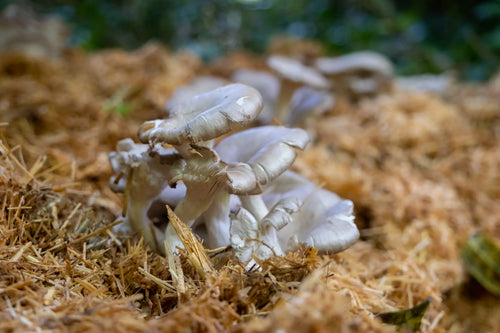
When growing mushrooms outdoors, it is important to properly identify your mushrooms before eating them. This is because growing outdoors opens your mushroom bed to outside inhabitants – it is possible that other types of mushrooms could appear and grow within your mushroom bed.
Generally speaking, it is best to avoid growing Agaricus mushrooms. Agaricus mushrooms (which include button and portobello mushrooms) are characterized by fleshy caps with an underside of gills. We recommend steering clear of these mushrooms as they are very similar to various poisonous mushrooms species and can be easily confused.
Growing Mushrooms Outdoors FAQs
How can I prevent insects and pests from eating my crops?
There are a few measures you can take to prevent pests outdoors, but you should know that they cannot be completely avoided. The best way to avoid pests eating your mushrooms is to harvest them as early as possible or to use a form of netting.
We strongly recommend avoiding any use of pesticides as this will likely be absorbed by your mushrooms.
How do the mushrooms grow without pasteurising or sterilizing the substrate?
Despite general best practices and advice, not all mushrooms require the substrate to be sterilised or pasteurised. These measures are taken to maximise the chance of success and yield in commercial environments. Some species of mushrooms are more aggressive than others – such as oyster mushrooms – and can often outcompete competing organisms if present.
How often can I expect to see flushes with a mushroom bed?
This really depends on your setup and environment, but generally speaking, mushroom beds aren’t as fruitful as other growing setups. Mushroom beds produce mushrooms much like you would expect to see in the wild – with sporadic flushes throughout different times of year – such as Autumn time after regular rainfall.
Does mushroom mycelium die in colder winter months?
Your mushroom mycelium should not die during the winter months. When the temperature falls too low for growth, the mycelium will stay dormant until the temperature increases.