Growing mushrooms indoors in buckets are a great way to get started if you’re a beginner or a hobbyist looking to try something new. You may grow mushrooms in a variety of containers, from bags to logs, but buckets are often one of the simplest and most useful methods of growing.
In this blog, you’ll also find a step-by-step guide on growing mushrooms in buckets, the benefits and downsides, as well as some of the most prevalent problems that might occur and how to solve them. We will also look at the several species of mushrooms that may be grown in buckets and the best substrates to utilise.
Tried buckets, logs, or coffee grounds? Our mushroom growing kits offer a simpler, faster-growing alternative with predictable results – explore the full range now.
Why grow mushrooms in buckets?
Growing mushrooms in buckets mean you don’t need any expensive or specialist equipment, and you can create a great number of mushrooms with little work. It’s a great approach for beginners to start growing mushrooms because it doesn’t require any special abilities or prior knowledge.
Small-scale mushroom production and urban mushroom gardening are ideal for growing mushrooms in buckets. Whatever space you have, in a spare room, cupboard, or basement, you don’t need much to create an effective mushroom production system.
Growing mushrooms in buckets, like every other form of mushroom cultivation, has advantages and disadvantages. We have listed a few below:
Advantages
- Buckets are easy to come by.
- The buckets can be reused, reducing the amount of plastic waste produced, as opposed to growing mushrooms in bags.
- Buckets are self-supporting and do not require additional support like larger grow bags.
- Buckets can be stacked, allowing you to maximise your storage capacity.
- Buckets are best for small-scale businesses.
Disadvantages
- Washing buckets before reuse is time-consuming, making them unsuitable for large-scale commercial production.
- When full of the substrate, large buckets may be difficult to handle.
- Contamination danger is higher.
Which mushroom substrate is best to use for a bucket grow?
Depending on the species of mushrooms and whether you plan to grow them indoors or outdoors, the ideal substrate to utilise for growing mushrooms may vary. Coffee grounds, straw, sugar cane bagasse, coco coir, and vermiculite, as well as sawdust, hardwood pellets, manure, logs, and cardboard, are all popular mushroom growing substrates.
More information about mushroom substrates and how to prepare them may be found in our Comprehensive Guide to Mushroom Substrates. Below we’ve covered a few popular substrates for growing mushrooms in buckets.
Woodchips
For many varieties of mushrooms, wood chips are another excellent substrate option. The species of tree from which the material comes counts, but many hardwoods are suitable, and material from multiple species can be combined.
Straw
Straw is a low-cost, high-performance substrate. It can be found in farm stores, pet stores, and other places that sell animal feed and bedding. Corn stalks and other similar agricultural products can also be used. You have the option of growing in a 100% straw substrate or adding nutrients with additives.
Coffee Grounds
Growing mushrooms from coffee grounds is an easy to work with and low tech mushroom substrate choice. Coffee grounds do not require pasteurisation or sterilisation as long as they are put to use quickly and handled with proper hygiene and care. This is a fun and alternative substrate choice for hobbyist growers who are looking to try something a little different.
One of the main advantages to using coffee grounds as a substrate is that the brewing process pasteurises the grounds, allowing you to skip the additional steps needed for other substrates. We have a full article on growing mushrooms in coffee grounds, which you can find here.
It’s important to note that coffee grounds often perform best when mixed with other substrates.
Best mushrooms to grow in buckets
In buckets, you can cultivate a variety of side-fruiting mushroom types. Lion’s mane and oyster mushrooms are examples of wild mushrooms that grow on trees and would sprout sideways.
Oyster mushrooms are the greatest choice for bucket growing. They grow quickly, are less sensitive to environmental factors than many other mushrooms, and maybe grown on a variety of substrates.
Bucket culture is ideal for side fruiting oyster mushroom species such as white, pink, blue, or yellow oyster mushrooms.
Top fruiting mushrooms which grow on the ground in the wild, such as king oysters, aren’t the best kinds of mushrooms to grow in buckets. They’re also a touch more finicky and difficult to produce than other oyster mushroom varieties.=
It is, nevertheless, feasible to grow king oyster mushrooms in buckets; they will grow in clusters like other oyster mushrooms. However, they may not grow to the same size or have the same thick stems. Try one of the other oyster mushroom kinds first, especially if you’re new to mushroom cultivation.
Growing mushrooms in buckets: the steps
Below we walk you through the process of growing oyster mushrooms in a bucket with these step-by-step instructions. For our example, we’ll be using straw substrate and oyster mushroom spawn.
Step 1. Preparing your equipment
Before you begin to grow your mushrooms in buckets, you will need:
-
A 20 litre (5 gallon) plastic bucket
You have the option of purchasing a new bucket, which is easily accessible and inexpensive, or re-use an existing bucket.
Consider any chemicals that may have been in the bucket before if you’re utilising a second-hand bucket, these may infect your mushrooms. If you’re unsure, it’s better to start with a fresh, clean bucket.
-
Mushroom spawn (i.e. oyster mushroom grain spawn)
To produce oyster mushrooms in a 20-litre bucket, use spawn at a rate of 5 to 10 per cent. This means every 20 litres (5 gallons) bucket will require 1 – 2.3 kilogram of grain spawn.
A 10 per cent spawn rate will quickly occupy the bucket, increasing your odds. However, you can get away with using less and still be successful.
-
Mushroom substrate mix (i.e. straw or woodchips)
We recommend a straw substrate for your first foray into growing mushrooms in buckets, this is because the particle size of shredded/chopped straw allows for optimum air exchange.
If you can’t find chopped straw, you can buy a bale of straw and cut it into short pieces no longer than 5 cm. You’ll need enough chopped straw to completely fill your bucket.
-
Electric drill and 12mm drill bit
This will be used to make holes in your bucket.
-
Microporous tape
Micropore tape is an adhesive paper tape that is breathable. It’s sold at pharmacies alongside bandages and dressings.
During incubation, cover the holes in the bucket with microporous tape to keep moisture in whilst still allowing air exchange.
-
Pasteurisation container
A container to hold your water. This container should be large enough to hold the amount of pasteurised substrate you intend to use.
Step 2. Preparing the bucket
After you’ve gathered all of your materials, it’s time to get your bucket ready.
Drilling the holes
To begin, drill holes all the way around the outside of your bucket. The holes in the bucket’s side serve as both ventilation and fruiting holes. The mycelium produces carbon dioxide during colonisation. The bucket’s holes allow fresh air to circulate and regulate carbon dioxide levels.
There are no hard and fast rules here, however, we recommend drilling holes that are 10–15mm in diameter and spaced 10–15cm apart.
You can also drill a few small holes in the bucket’s bottom to drain any surplus water. Remove any jagged portions with a knife once you’ve completed drilling the holes. Then, using warm soapy water, thoroughly clean your bucket and lid.
Sterilising the bucket
Before you use your bucket you need to sterilise it to ensure no bacteria will infect your fresh mushroom spawn. You can sterilise your bucket in a few ways:
- Isopropyl alcohol: This should be used to clean your bucket as well as all of your materials and equipment. It’s critical to sanitise everything throughout this process to avoid the spread of unwanted bacteria.
- Heat sterilisation: You can also use boiling water to sterilise your bucket. This is an easy and inexpensive way to clean your bucket, simply fill it with boiling water and wait for it to cool.
Step 3. Pasteurising the substrate mix
Pasteurisation is used to make your substrate fairly contaminate-free in order to offer your oyster mushroom culture a head start. You can pasteurise your straw in two ways:
Hot water pasteurisation
This process entails immersing your substrate in a large pot of boiling water for one hour at 60–80 degrees Celsius. Before you add your mushroom spawn, ensure that the heat pasteurised substrate has been cooled for at least 8 hours
Coldwater lime pasteurisation
Coldwater lime pasteurisation uses lime to raise the pH of the water, effectively destroying pollutants. It involves soaking your substrate in a bath of lime-treated cold water for 24 hours. It’s less energy intensive than other popular pasteurisation methods.
For this process you will need:
- Hydrated lime
- Water
- Straw
- A netted bag
- Bucket or container
- Gloves
- Mask
- PH levels testing materials
- Disinfectant spray or isopropyl alcohol
Below we outline the process to pasteurise using hydrated lime:
- Fill your netted bag halfway with chopped or shredded straw.
- To make room for the substrate, fill your container with water to around 60% of its capacity. When you submerge the substrate in the water, if it’s too full, it’ll overflow.
- Wearing gloves to protect your hands and a mask to avoid inhaling fumes, apply hydrated lime to the water at a rate of 0.2% lime to water content. For every litre of water, 2 grams of hydrated lime is used. Stir well after sprinkling the lime into the water.
- Take a sample of water and test the pH after the lime has dissolved. A pH level of 11 to 13 is ideal.
- You can now immerse your straw bag in the lime bath. Because the bag of straw will float, you’ll need to weigh it down with a heavy object to keep it totally covered.
- Allow the straw to pasteurise and hydrate in the lime bath for 16 to 20 hours.
- Using your disinfectant spray or isopropyl alcohol, wipe any surfaces you intend to use.
- Remove the bag from the water and hang it on a rail or place it on a sterilised surface. Allow it to drain for at least an hour.
Before using the straw, it must have reached “field capacity,” which normally takes about an hour. If you’re in a rush, take the straw out of the bag and place it on a clean, sterilised surface to expedite the process.
The squeeze test is the simplest way to check if the straw is ready. Squeeze it in your hand and if it only releases a few drops of water it is ready. If too much water leaks out, it needs to drain for a little longer.
Step 4. Add mushroom spawn into the substrate mix
Once it’s properly drained, it’s time to inoculate your pasteurised straw. To avoid contamination, you should complete this procedure as soon as possible after pasteurisation.
First, use the alcohol spray to clean the interior of your bucket. Then use a small square of micropore tape to plug the holes on the bucket’s sides.
Assemble something similar to a lasagna or layer cake in the bucket by layering straw and grain spawn. Begin with a layer of the substrate at the bottom of the bucket, followed by a layer of spawn, and then more substrate.
Stack the straw and spawn in the bucket until it’s completely full. Make sure your last layer is a layer of straw when you get to the top of the bucket.
Fill the bucket to the brim and pack it firmly, but not so tightly that it escapes through the holes. Place the bucket’s lid on top and label it. To keep track, it’s a good idea to jot down the date, mushroom species, and substrate you used.
Place micropore tape over the holes once you have filled your bucket. You do this to maintain moisture within your substrate whilst allowing for optimal air exchange and circulation.
Step 5. Allow mycelium to colonise (the incubation period)
Before you can get a crop of mushrooms, the mycelium must thoroughly colonise the substrate.
Place your bucket in a warm, dark location that is warm at all times of the day and night. The optimal temperature for incubation is between 18 and 24 degrees Celsius. This is the average room temperature in various places.
How long does it take to colonise?
The rate of colonisation is affected by temperature, the amount of spawn utilised, and the type of mushroom cultivated. Complete colonisation should take 10-14 days at room temperature.
After five days, open the lid and inspect the straw for any spots of white, cottony growth. The patches will connect up over time, anywhere from 10 to 21 days, and the substrate will turn totally white with mycelium.
It’s possible that the mycelium will push through the tape and begin to fruit.
Step 6. Fruiting
When the mycelium runs out of food (substrate) at the end of colonisation, it will be eager to produce mushrooms in order to survive.
Mushrooms in the wild grow in reaction to stress, such as a lack of food or changes in their habitat. All you have to do to recreate this is provide the correct circumstances for mushroom growth. Below we outline a few things you need to consider:
Temperature
The optimal temperature for fruiting varies by mushroom strain and is unique to each. However, the majority of oyster mushroom strains aren’t too picky.
They should fruit as long as the temperature is between 10 and 30 degrees Celsius. Humidity
It’s important to keep humidity levels consistent when mushrooms are developing. Because the mushrooms will develop from the holes in the bucket, misting the holes many times a day will keep the mycelium from drying out.
Baby mushrooms thrive in humid environments, and if the mushrooms become too dry, they will stop growing. So mist as often as you can, or cover the bucket with a bag to keep the humidity up.
Humidity levels are less important once you’ve passed the first growth stage. However, you should keep spraying the mushrooms twice a day to promote growth and prevent them from drying up.
Airflow
When exposed to fresh air, the mycelium is stimulated and will start to produce mushrooms. In the wild, Oyster mushrooms will grow from stumps or logs in fresh, oxygen-rich air.
To make sure your mushrooms get adequate airflow you can remove the tape from the holes once you see small pin heads start to grow. Though If you’re growing your mushrooms outside, you’ll want to keep them out of the wind so they don’t dry out while growing.
Light
For oyster mushrooms to grow, they require some light, but not too much. A shady location with indirect lighting will work best.
Make sure the bucket isn’t in direct sunlight or too close to a light or another source of heat, such as a hot lamp.
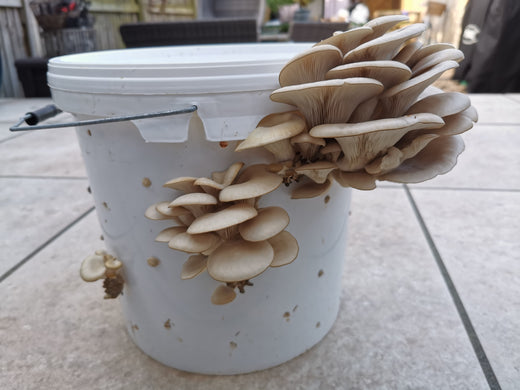
Step 7. Harvesting your mushrooms
When the caps of your oyster mushrooms start to flatten out and curl upwards, it’s the perfect time to harvest them. It signifies they’re on the verge of releasing their spores. It’s better to harvest them before they lose all of their spores and begin to degrade.
Beginners may find it difficult to determine when this is the case. It’s time to harvest your oyster mushrooms if they stop growing, start drying out, or start dropping a lot of spores (white dust).
Cutting the whole cluster off at the back against the hole in the bucket with a sharp knife is the easiest technique to harvest a bucket of mushrooms.
Your colonised substrate can produce a second and even a smaller third crop of mushrooms. To aid this, use a pointed knife to remove any remaining stem fragments, leaving only the substrate visible in the hole. Continue to spray water into the holes twice a day. The mycelium will recolonize the holes in a few days, and more mushrooms will emerge in one to two weeks, giving you another flush.
Troubleshooting issues with growing mushrooms in buckets
Here are some of the most frequent problems that arise when growing mushrooms in buckets, as well as how to solve them.
Problem: My mycelium isn’t colonising the substrate mix
Your mycelium won’t colonise your substrate for a few reasons, here are some common reasons this may be happening:
Possible Cause: Poor air exchange
Poor air exchange can be caused by two factors.
The substrate has been compacted. When growing mushrooms in 20-litre buckets, we recommend using a straw to avoid compacted substrate.
Alternatively, if utilising a substrate with small particles, such as coffee grounds, combine them with 20–50% pasteurised straw to ensure adequate ventilation. Also, when filling the bucket, be careful not to overfill it.
Poor air exchange also occurs when the holes in the bucket are too small or there aren’t enough of them.
Remember if your substrate dries out during incubation, colonisation will be impossible. This could happen due to excessively large holes or a lack of humidity. You can avoid this by covering the holes with micropore tape and spraying them twice a day. If required, cover your bucket with a plastic bag to maintain a high degree of humidity.
Problem: Contamination
Contamination is a big issue when it comes to growing mushrooms in buckets, as it will ruin your entire growth.
Possible Cause: The heat is too high
Contamination can occur if the centre of your substrate heats up too much. This can be caused by too much nitrogen in the substrate, a warm incubation environment, or a lack of airflow.
The optimal temperature for incubation is between 18 and 24 degrees Celsius.
Incubation will take longer if it is too cold, while contamination may occur if it is too warm.
Problem: Mushrooms are not pinning
It could be for a variety of reasons that your oyster mushrooms aren’t pinning, even in fruiting conditions…
Possible Cause: Contamination
The substrate in your bucket is polluted. You must restart the process if this is the case.
Possible Cause: Substrate not fully colonised
Your bucket isn’t completely colonised. Examine the straw to check if the mycelium has spread throughout. You may need to wait a little longer if this is not the case.
Problem: Mushroom pins are aborting (dying)
If you notice pins sprouting but then halt growing, it’s most likely due to a decrease in humidity. Spraying your pins with water will sometimes bring them back to life. However, if they become too dry, they will stop growing.
Picking off “aborted” pins and waiting for new ones to form is an option. Maintain high humidity by spraying the pins frequently and, if required, covering the bucket with a plastic bag.
Share:
Ultimate Guide to Mushroom Substrates
How to Grow Mushrooms on Coffee Grounds